Wednesday, December 21, 2011

Random Act of Kindness


Today I had a rough morning. I know as a mother I’m supposed to be the one who holds it all together when everyone else is falling apart, but I just couldn’t do it today. One kid woke up cranky and got another kid cranky, and I joined the cranky team. My great wisdom and many years of experience failed me big time.

I seriously couldn’t figure out how I was going to get in a better mood. I didn’t want to listen to music. I didn’t want to read. I didn’t want to go on a walk. I really didn’t want to do anything. Suddenly I remembered something I saw on Pinterest. One woman spent her 35th birthday doing 35 random acts of kindness with her children. I didn’t have all day to do random acts of kindness, but I did have a half hour.

I loaded up the kids and grabbed $3 in quarters. As I handed out the quarters to the kids, I explained that we were going to be Santa’s helpers.  At first the kids were super excited, but after seeing the neat things in the candy and toy machines they wanted to buy something for themselves. I reminded them that today our treat was to give to others, and they quickly got back into the spirit of things.

We had so much fun running from store to store leaving little surprises for some lucky kid to find. We went to a strip mall so they would all be close together and hit Albertsons, Ace Hardware, Dollar Tree, the laundromat, and Blockbuster. As we were running over to the bank, Camille said she felt warm inside and that she knew that was the Spirit. Tate told me he felt “very smurfy.” {Has anyone else seen The Smurf’s one too many times?} As we were looking for a candy machine, the teller at the bank asked if she could help us. Unfortunately the only candy they had was what the tellers hand out to the kids, which sparked an idea. We asked if she would give our quarter to a kid who came in to the bank and wish them a Merry Christmas from another kid helping out Santa.

It was the best medicine EVER. Seriously. If you're having a rough day you should try it. If you need ideas {or even just one!}, here is the original post.

More Healthy Alternatives

I like to eat healthy, but I sooo enjoy having some sugar. Sometimes I'm looking for a "more healthy" option rather than a healthy option :) So these tricks probably aren't for the person on a diet, but rather the person looking to cut back a little. Did you know you can substitute applesauce for vegetable oil in almost any bread type recipe? I had a friend in college who was an excellent baker and she taught me this trick. I've used it in store-bought cakes and muffin recipes.

I hate having to buy special ingredients for recipes {especially perishable ones}. It seems I only use a small amount and then the rest of the container goes bad because I don't know what to do with it. One such ingredient for me is buttermilk {which I rarely use in baking or cooking} so when a recipe calls for it I make my own from scratch. Not only do I save money and avoid waste, it also contains less fat - especially if you use skim or 1% milk. Put 1 Tbs. lemon juice in a glass measuring cup and add milk until you have one cup. Let this mixture sit for at least 5 minutes before using in a recipe. Can't tell the difference!

If these tricks sounds familiar, it might be because I posted this information in my "Mommy can I have another" best ever bran muffin recipe, but sometimes it's helpful to have the info right in front of you. Or maybe you didn't even see these substitution tricks because you tuned out when you saw the words bran muffin. It's okay. Not everyone likes muffin tops. Or bran. But now you have a couple more tricks up your sleeve.

"Mommy can I have another" Muffins

Tate told me this morning that he can eat five of these in one sitting, but I cut him off at four and handed him a yogurt. My kids absolutely LOVE these muffins. The recipe makes about three dozen, and they're usually gone within 24 hours. The nice thing, is that if your family knows how to pace themselves {unlike mine} the batter can be refrigerated for up to two weeks so you can pop them in the oven and have fresh, warm muffins anytime you like. This is especially handy on busy work or school mornings. I haven't tried freezing the batter yet, perhaps I'll give it a shot next time. Without further ado, here are the best bran muffins ever {at least, they're the only ones I've ever enjoyed}.

Bran Muffins
2 C All-Bran
1 C Bran Buds
1 C boiling water

Combine above ingredients and let sit until not hot anymore.
Then add the following ingredients:

2 beaten eggs
1/2 C vegetable oil*
1 1/2 C Sugar
2 1/2 C Flour
2 1/2 tsp. Baking soda
1/2 tsp. Salt
2 C Buttermilk**

Mix ingredients well, pour into greased muffin tins, and bake at 400 F for 18-20 minutes. Leftover batter can be stored in fridge for up to 2 weeks.

*You can substitute applesauce for vegetable oil in most bread type recipes {including store bought cake mixes}. I've don it in this recipe and can't taste the difference.
**No buttermilk? No problem! In a glass measuring bowl, put 2 Tbs. lemon juice and fill with milk until you have 2 cups. Let sit for five minutes before using it in recipe.

Tuesday, December 20, 2011

Old McDebbie's Farm

I just heard about this fun farm that I want to check out next year! It opens in March and there are train rides, pony rides, fishing, and animals to feed. In April they have Easter Egg Hunts. In October they have Friday night fires for marshmallow roasting and a not-so-scary Halloween trail. This place sounds like a blast! Why am I posting about this in December?  I just found the flier in "the pile" {more on that here} and want to throw away the flyer, but I don't want to forget about it! So we'll see you in 2012, Old McDebbie!

Monday, December 19, 2011

Ultimate Camping List

As we approach the end of 2011 I am trying to get organized. Who am I kidding? It has nothing to do with the fact that the year is ending! I'm constantly battling with my messy self {and family...it can't all be me, right?} No matter what the reason or the culprit, the fact is it's time to address "the pile." Please tell me I'm not the only one that has a pile of papers begging for a home. When it's time to clear the table for dinner or a project, all papers get thrown on "the pile." I have schoolwork, flyers for events, activities, and places I want to visit, things to be filed, notes for websites I want to check out, and lists of things I need to remember. One such list is our ultimate camping list. Anytime I'm camping and want something, I write it down and add it to the list when I get home. I had the perfect and complete list at one point, but I lost it. So now it shall go on my blog, never to be lost again! That's right, while other people are blogging about Christmas, cookies, and presents I am blogging about camping.

flashlights
lantern
sleeping bags
extra blankets
pillows
air mattress
air pump
bath towels
hand towels
washcloths
toothbrushes
toothpaste
floss
face wash
soap
shampoo
conditioner
glasses
extra contacts
contact case
contact solution
baby soap, washcloth, and towel
garbage bags
lawn chairs
marshmallow roasters
chapstick
lotion
t.p.
paper towels
sandwich bags
swim suits
sunscreen
aloe Vera
calamine
bug spray
beach towels
water toys
life jackets
bikes
helmets
sandals
tennis shoes
baby high chair
play pin
baby spoons
sippy cup
bibs
bottle
diapers
wipes
sweatshirts
light jackets
baseball caps
baseball, bat, mitts
hand sanitizer
antibacterial spray
big metal bowl for washing dishes
dishcloth & towel
dish soap
sharp cutting knife & cutting board
bowls
plates
silverware
mugs
frying pan
pots

Depending on where we're camping, what ammenities they have, and what phase of life I'm in {babies, etc.} the list may change. These are just things that I have needed in the past so I've put them on the master list. Did I forget anything? This isn't my original and I started from scratch with this camping season...as in this last summer, not this December. And if you're mathematically inclinded, you've realized that this has been sitting in "the pile" for about four months. Now don't you feel better about yourself?

Friday, December 16, 2011

Asian Salad

Camille absolutely loves this salad! She requested it this year for her birthday dinner and asked me to put it in her "cookbook." We also had sesame chicken wings and white rice.

Asian Salad
2 packages Ramen noodles, crushed (discard seasoning packet)
1 tsp. sesame seeds
1/4 cup butter or margarine
1 head cabbage, shredded or finely chopped (or a bag of coleslaw blend if you don't want to do any chopping)
1 bunch of green onions, chopped
3/4 C vegetable oil
1/4 C distilled white vinegar
1/2 C white sugar
2 Tbs. soy sauce

1. In a small sauce pan bring vegetable oil, sugar, and vinegar to boil for 1 minute. Cool. Add soy sauce.
2. In a medium skillet over low heat, melt butter and brown ramen noodles and sesame seeds. Once browned, remove from heat and cool.
3. In a large bowl combine shredded cabbage and chopped green onions. Add the noodle and soy sauce mixtures.  Toss to coat, and serve immediately so noodles stay crunchy.

Monday, October 24, 2011

Cheesy Potato Casserole

I made this recipe the other night for the first time, though we were pretty sure we'd love it because it is one of Todd's favorite family recipes (also known as funeral potatoes). It was super hot when it came out of the oven, so Todd began dishing it out on the kids' plates so it could cool. Tate was very alarmed by such action and exclaimed, "What are you doing?! What if I don't like that?" To which we replied he could pass it on over! Tate's eyes got big as he tasted it and continued to shovel it in. He then had seconds.
Cheesy Potatoes
1 can cream of mushroom or cream of chicken soup
1 cup sour cream
1/2 cup melted butter or margarine
1 (32 oz..) package frozen hashbrowns
8 oz. shredded cheddar cheese
1 medium onion, chopped
1 1/2 cups cornflakes
1. Mix soup, sour cream, melted butter, hashbrowns, onion, and cheese and spread in a 9 x 13 pan.
2. Crush cornflakes and sprinkle over top.
3. Bake at 350 for 45 min. or until hot.

Tuesday, September 6, 2011

The Lunch Bunch

The start of school marks the beginning of early mornings, homework, and sack lunches.  It's enough to keep any mother awake with excitement {or not}. Oh, and remember those first day of school nightmares? I had the mom version where I didn't take my kids to school until 1:30...and to last year's teacher.

I think the biggest real life nightmare is going to be packing lunches. My sack lunches are pretty standard and seem to illicit groans and pleas for expensive school lunches. Today was the first day of school and I'm already stuck in a rut. I need some fresh ideas to satisfy the kiddos and myself. No, I'm not planning on going back to school, but I hate making lunch twice. If I make the lunches tempting enough, maybe even the hubby will get in on the "let's save money and pack our own lunches" program.
My goal is to make packing lunches fast, easy, healthy, affordable, and fun. Oh, and without the kids complaining. Impossible? We shall see. On that note, I'd better start with fun {and healthy}. Here are some ideas I've collected for this school year:
  • Have the kids sit down with me and make a list of their favorite fruits, vegetables, dairy, and meat choices. I'll pick from this list when I'm making my meal plan for lunches.
  • Try new combinations. Mix two fruits together, switch up the bread choices {waffles, pancakes, bagels, English muffins, pitas, croissants, tortillas}, chicken and tuna salads, veggie sandwiches, etc.
  • Add dips for fruits and vegetables. Here are some adaptable ideas for packaging anything that needs a dip.
  • Cut it out! Kids {and grownups} like variety. Just cutting or slicing something differently can make it more appealing. Mellon balls instead of wedges, apples sliced so you can see the "star" in the center, cheese cut into shapes, fruit pieces to eat with a toothpick {Sidenote, I just tried this yesterday at home - the kids had apple pieces with a toothpick for a fork, and Camille said, "Ooooh. Fancy apples!}
  • Improve presentation. The kids got {cute} new lunch boxes and I'm going to try to package things differently.  Camille saw a cute little cottage cheese and fruit combo at the store, and I'm pretty sure it was the package she wanted more than the contents. So this falls under the new combo category also...at her request. Keep it interesting! Sometimes I'll put a sticky note on a tupperware container. Or have a "find the sticker in your lunch" day. But not EVERY day. That would be way too much work. Just when things are getting a little boring.
Here are some fun resources I plan to reference regularly in my quest to make lunch time more interesting. Some of the above info came from these websites also.
free lunchbox printables
www.weelicious.com/ This is a great resource! More than just lunch recipes - her videos are fresh and fun with some great tips on keeping mealtimes interesting.
http://www.ilunchbox.com/ Devoted to all things lunch.
http://www.laptoplunches.com/ 365 lunch ideas. You can also sign up to receive weekly lunch menus
http://www.school-lunch-ideas.com/ Looks like a fun site I could get lost in!
More lunch ideas
Sandwich and snack ideas


How do you keep sack lunches fun for your kids? Any tricks on getting your hubby to take a lunch to work?

Thursday, August 18, 2011

Feelin' Saucy

Have you ever opened up your cupboard to realize you only have tomato paste when you really need tomato sauce? Well I have. And more than once. In fact, it just happened the last time I made Sloppy Joes.

Enter my good friend Google. Solves many a quandary, especially in the kitchen. Here's how I made sauce from paste. I had a small 6 oz. can of tomato paste and added 1 ½ cups water to it. Yep, that's it! Some people suggest adding a little brown sugar to sweeten it, but I didn't find that necessary in my recipe. I was so happy with the results, I will never buy tomato sauce again!
Apparently the mom in me focused on the cute kitchen help instead of the ingredients. However, if you look closely you can see our homemade tomato sauce in the background on the stove.

Psst. If you only have tomato sauce and need tomato paste, I hear you can cook it in a pan until it is reduced by half. I've never tried it though, so let me know if you do and it works {or doesn't}! And while you're thinking about sharing, do you have any substitution tricks up your sleeve?

Tuesday, August 16, 2011

Sloppy Joes

The other day we were eating something when Camille turned to me and asked if I could give her the recipe when she grows up. For the life of me, I can't remember what we were eating {and neither can she!} Seriously, it's been about two days. So the idea was born to post all of her and Tate's favorite recipes on my blog along with a family story or memory. Hopefully along the way you'll find something you like, too.

Our sloppy Joe {baby Joseph} loves Sloppy Joes! We took this meal with us the other night when we met Todd for a picnic at the Tacoma Nature Center. They have a super fun play area with slides that look like logs, bridges over water and even some telescopes. There are also some wonderful trails for hiking, which we enjoyed after dinner. If you go before 5 pm, the indoor nature center is open with some fun exhibits for the kids. You can also pick up a list of all the animals living in the area and see how many you can find on your walk. Great fun, and all free! {for more free summertime activities check out this post}

SLOPPY JOES
1 lb. ground beef
¼ C brown sugar
1 ½ tsp. steak seasoning blend {we use McCormick Montreal seasoning}
1 medium onion, chopped
1 small red bell pepper, chopped
1 Tbs. red wine vinegar
1 Tbs. Worcestershire sauce
2 C tomato sauce
  • Break up meat in pan and add brown sugar and steak seasoning.
  • When meat has browned, add onion, red bell peppers, red wine vinegar and worcestershire sauce. Reduce heat to medium and cook for 5 min.
  • Add tomato sauce; stir to combine. Reduce heat and cook 5 minutes.
I like to double this recipe and freeze half for a quick meal on a busy day.
I also prefer to make my own tomato sauce from tomato paste so I only have to stock one tomato product.
This recipe was adapted from Rachael Ray...for the original recipe, click here.

By the time we set out on our little hike the sun was getting low in the sky. Tate forged ahead with the walking stick he found.

Couldn't catch a picture of any fish jumping in the air - they're quick little buggers {truly teensy - truth be told, we couldn't even tell if they were fish}. But here you can see the water rings where they were jumping. They were all over the place!

 Feeding time for the ducks {it should be noted this was a natural meal time at the nature center - we didn't feed any animals}

The bridge behind Camille is where we saw the no-see-em' fish and the dining duck.

 
Camille found some flowers that she photographed.
  
I occasionally enjoy lagging behind my family {just for a moment} 
and quietly take in the sight of my greatest blessings.

Thursday, August 11, 2011

What's Going on Today?

I made a list of activities to do this summer, but some of these activities are only available on certain days. I love the idea of being organized so I printed off a blank calendar for the month and began filling in activities. As much as I love this idea, it's just not practical for me and my family. Sometimes stuff comes up at the last minute or I realize no one has socks {or worse yet, undies} and I have to do laundry again. Sometimes I wake up and have a meeeellion things to do and can't function until I get some of it done. This new list makes it easy for me to have fun on a whim without scouring every webpage on my master list.

Monday
Hmmm...no special events for Mondays. If you're looking for something to do, check out the "Any Day" Activities or this post for fun free indoor activities.

Tuesday
Lawn Bowling at Wright Park 1-3
Tacoma Farmer's Market on 6th Ave. 3-7
Concerts at American Lake Park 6:30
Regal Movie for $1 10 a.m. {Go early to make sure you get decent seating! 9:40 was perfect for us}
Starplex Cinema $1 movies {and $1 hotdogs!}

Wednesday
Wagon Shop {at Steilacoom Museum} 2-5
Steilacoom Farmer’s Market 3-7
Steilacoom's Concert in the Park 6:30
Regal Movie for $1 10 a.m. {Go early to make sure you get decent seating! 9:40 was perfect for us}

Thursday
 Tacoma Farmer's Market on Broadway 10:30-4
{You can ride the Tacoma Link Light Rail to the Farmer's Market for free - make it part of the adventure!}
Concert in the Park at Curran Apple Orchard 6:30
Tacoma Children's Museum FREE admission 10-5
Museum of Glass FREE from 5-8 on 3rd Thursday
Washington State History Museum FREE from 2-8 on 3rd Thursday
Tacoma Art Museum FREE from 5-8 on 3rd Thursday

Friday
Hmmm...no special events for Fridays. If you're looking for something to do, check out the "Any Day" Activities or this post for fun free indoor activities.

Saturday
Steilacoom Historical Museum Kids Club {last Saturday only}
Wagon Shop {at Steilacoom Museum} 1-5
Lawn Bowling at Wright Park 1-3 FREE
Brown's Point Lighthouse 1-4 FREE
Tacoma Nature Center- 10-4 FREE {Discovery Pond & Trails open til dusk}
Ride the miniature steam engine in Port Orchard, donation basis, 2nd and 4th Saturdays only from 10-4
Lowes Build & Grow Events {see website for specific dates; not every Saturday}
Michael's Make it Take it Events {see website for specific dates; not every Saturday}

Any Day*
Tacoma Nature Center FREE 8-5 {Discovery Pond & Trails open til dusk}
Lott Wet Science Center 10-4 FREE
Pick blueberries at the Blueberry Park for FREE
Visit a Sprayground
Ride the ferry out to Anderson Island, $4.70 for adults, $3.40 for kids 5 and up {I know this isn't very close to free, but I really want to do this one so I'm adding it to the list}
Ride the Tacoma Link Light Rail to downtown Tacoma FREE
Tacoma Union Station FREE weekdays 8-5
West Hylebos Wetlands dawn to dusk {don't forget to download your scavenger hunt!}
Nisqually National Wildlife Refuge sunrise to sunset
Art in the Park
Hike/walk the gardens...photo scavenger hunt anyone?
Visit a local beach or pier
Take a walk around Chambers Bay {a little history anyone?}
Go to the library!
Starplex Cinema $2 movies {and $1 hotdogs}
Bowl for FREE 8-6 {must pay for shoe rental $2.50 each}

*Please note that activities listed under "Any Day" may have special hours or be closed on Sundays. Our family uses Sundays as a day for worship and family activities at home so I didn't list special Sunday hours. Individual websites contain any additional information you may need, including directions and contact information.

Where are some of your favorite places to go in the summertime? Any local hidden treasures? I'm sure I've missed tons of fun places to go and things to do. Please share!

Monday, August 8, 2011

Summer Fun on the Cheap

I don't think you have to spend an arm and a leg to have a good time, although sometimes spending an arm OR a leg is okay. But never both. Today I feel like keeping all of my apendages, so here's a list of things we plan to do this summer. Don't mock me - we still have a month of summer left! {To see one of the reasons we are getting a late start on summer activities, check out this post about how we've been spending our Saturdays} And in my defense, it should be known that we have already done many fun things - some on  the list, and some just lazing around enjoying family and friends at the pool or elsewhere.

Almost all of these activities are free. I have tried to list any costs that I know of so you can easily browse what will fit your budget for the day.
Some of these ideas came from the Parks and Recreation, friends at church, the library, and a local MOPS group so make sure you check out your local sources for some great ideas! For more ideas, check out my rainy day list - a lot of these would be great during the summer as well.

What are you doing this summer? Did I miss anything fun and free {or cheap}? Please share!

I was not paid or perked to mention any of these businesses or services. I just find them to be helpful in having a fun and safe summer and hope you will, too!

Saturday, August 6, 2011

Silver Screen Performances

Today happens to be Lucille Ball's 100th birthday {that is if she were still alive}, but you probably already know that since you're on the Internet - it's everywhere! My six year old Camille wanted me to call Lucy and wish her a happy birthday. Since that's not possible, we'll just post it here: Happy Birthday Lucy!

Lucille Ball has many funny quotes and even more funny video clips, but I am loving this quote: "Ability is of little account without opportunity."  I don't know about the abilities I had prior to my opportunities, but I am grateful for the many opportunities in my life that have strengthened my abilities.

One of our most recent opportunities includes the stage.  That's actually why it's been so long since I've posted. We have been performing as a family! Not for the silver screen, but in a local Broadway Revue sponsored by our church. Today is our last day of performances and it's a little bittersweet. We have had so much fun doing this as a family, and it's been wonderful to see the kids' talents improve. We started by dragging Tate to rehearsals and are finishing by dragging him away from our living room stage where he is practicing to be an understudy for the two lead male roles {he's only about 10 years too young for the parts, but that's ok!} Even baby Joseph has been practicing - whenever the music comes on he bounces his knees and sings along. If I can ever figure out how to edit and post video I'll add our stage baby's performance. Pictures, however, I can do.

 My Wells Fargo Wagon family {Cody aka Wintrhop was a delightful add on}. At home, "Trouble" was the most quoted musical number from the show. It definitely lightens the mood when someone is being scolded and they throw their arms up in the air while singing, "Oh we've got trouble!"

 I found a guard and some cute street children in Aladdin's marketplace. My niece Brooke gave me two thumbs up, but when I asked her to give me a street pose she gave me the following:
 Perhaps I should have said, "Marketplace pose."


 Tradition! Fiddler on the Roof required that we always have our heads covered.

 This is what you get when you ask a bunch of cute kids to give you their best Lion King pose.
 
There Ain't Nothin Like a Dame...or my husband in a grass skirt!
The summer is nearly over and we are excited to finally be able to enjoy some weekends together...off the stage! We hope to go to the beach and take a couple mini road trips around Washington. We're especially looking forward to our annual fruit trip. So until then, the show must go on!

What have you been doing as a family this summer? Ever been on stage? Ever wanted to?...because that can be arranged!

Friday, July 22, 2011

The Great Bread Adventure

Several of my friends have asked for my bread recipe, so I posted it here. For me, getting started was the hardest part because I wanted to find the easiest, fastest way to make homemade bread. And I was really intimidated because I didn't know much anything about bread. There are a lot of great options I considered, all of which have links below...just in case I change my mind in the future about what works for me.

I learned how to see if my yeast was any good.
I had a lot of expired yeast. Apparently getting married, moving, and having a baby doesn't leave much time for baking. But here's the cool thing...the recipe above actually proofs your yeast at the begining of the recipe so you can skip this link and not waste any of your yeast! {My yeast that expired in 2009 was still good at the end of 2010, by the way. I kept it in the fridge, but it will keep even longer if kept in the freezer.}

I learned more than I ever wanted to know about yeast.
For instance, it's a fungus! Learning what hamburger really was turned three of my siblings-in-law into vegetarians. I wonder if they would stop eating bread, too. That was really the only disturbing fact, and now I've shared it with you - sorry! So go ahead, click on the link above if you're interested in yeast. Personally, I eat hamburger and bread. I know, I'm gross.

I learned I can use my bread machine for dough and then bake the bread in the oven.  I really prefer bread baked in the oven much more than in the bread machine! It all comes down to the crust; too thick, crispy and tough in the bread machine.

I learned I can use my KitchenAid mixer for dough!
Please don't laugh. I know I am soooo underutilizing my KitchenAid; it would probably make people crazy to know that until now I had only used it for mixing.  You have no idea how ecstatic I am about this - honestly, the mess of kneading dough played a big part in keeping me from making bread. Hence, the idea to use the bread machine for the dough. Since my KitchenAid discovery I have actually sold my space consuming bread machine.

I learned about freezing bread dough.
I thought about making a bunch of dough at one time and freezing it. This is great for saving on the mess, but it really doesn't save much time when you consider it has to unfreeze and rise which takes about eight hours. I actually recently tried this just to see how the bread turns out. I was NOT impresesd, as it greatly affected the quality of my bread. It almost seemed to separate - lots of air pockets when I normally don't have any. Odd.

Found a visual (yes, there are pictures!) guide to shaping bread dough for rolls and other goodies. Apparently once you have a dough recipe you like, you can shape it however you want to get different baked breads. Now that I have the dough, there's no stopping me! Except for maybe three things. You know, the short little cuties running around my house shoving freshly baked bread in their mouths.

So there you have it. Ready to bake some bread? Have you used the internet to learn a new skill that you were previously clueless about? Or find instructions for a project? Do share!

Thursday, July 21, 2011

Fresh Bread

Back in December I started baking my own bread, and now we enjoy fresh delicious bread for just pennies compared to store bought bread. Several of my friends have asked for my bread recipe so I decided to post it instead of writing it a million times.
I found an amazing recipe that only takes 2 1/2 hours from start to finish. Don't stop reading because of the time commitment! I was worried that I wouldn't be able to find the time to do this, but if I start the bread going before breakfast it's usually done by the time we are all showered and ready to go somewhere. If I have early morning activities scheduled I do it in the evening right after dinner. So far this year I've made about 60 loaves of bread!

This recipe is so stinkin easy and actually faster than using a bread machine. What could possibly be better than easy and fast? Well, let me tell you: DELICIOUS! I read a comment that helped me modify the recipe for use with my Kitchen Aid Mixer. Of course one could easily modify it back to traditional kneading if they want to, but I have great results with much less mess! Here is my version, which also includes less sugar so it's perfect for daily bread use. If you want the original version, click here.

White Bread
2 C warm water {recipe says 110º F, but I don't use a thermometer to check - I just run my tap water until it's borderline hot}
¼ C white sugar
1 ½ Tablespoons active dry yeast
¼ C vegetable oil
1 ½ teaspoons salt
6 C flour

1. In a large Kitchen Aid bowl dissolve the sugar in warm water, then stir in yeast. Allow to proof until yeast resembles a creamy foam {this is when I sift my 6 cups of flour, and it's usually proofed by the time I'm done measuring and sifting}.

2. Mix salt & oil into yeast. Using dough hook, mix in one cup of flour at a time. Let dough hook knead for 5 minutes. Take out and put a little oil in bowl; turn dough to coat. Cover with plastic saran wrap and a towel. Allow to rise until doubled in bulk; about 1 hour.

3. Punch dough down. Knead for a couple minutes til it's not oily anymore and cut in half. Use a rolling pin to squish out all the air bubbles and roll it into a rectangle shape about as wide as your bread pan, maybe a touch wider. Roll up, tuck in the edges to shape into loaves, and place in two well greased bread pans seam-side down. Cover with same saran wrap from above, cover with a towel, and let rise 30 minutes or until dough reaches top of pans or 1 inch above. Bake at 350º for 30 minutes. Remove from pan and let cool 10 minutes before slicing {otherwise bread will cave...believe me, I've tried to eat it immediately and it didn't work. Even after knowing it would cave if I sliced it right away I've done it, but boy was it delicious!}

If you're interested in doing a little learning yourself, check out this post with the links I found to be the most helpful in my quest for bread knowledge. You'll find info on shaping, freezing, and more!

Update: After making this bread recipe once or twice weekly for a year and a half, I realized somewhere over time I omitted a couple steps. I haven't noticed a difference in the quality of my bread, so I updated my recipe accordingly. Raise your hand if you like fewer steps and less time to make homemade bread!

Thursday, July 14, 2011

Thank you Teachers

Summer break has officially hit. The luxury of not going to school is over and the boredom has begun. Luckily I have some tricks up my sleeve, but more on that later.  As I was looking through our pictures I found this one from the last day of school.
This was such a fun, easy, and relatively fast project. I'm not one to reinvent the wheel, so if you're interested you can find the tutorial here. I would, however, modify the wheel by adding a little note about the ribbon {made to look like a ruler}. This tutorial doesn't mention length, but I found that 31 inches was just about right - the other one I made was shorter and I had a hard time tying it into a bow {sorry, Ms. Rogers}. And a word to the wise, be careful when carrying. The pencils aren't glued on {so they can be used later} and they will slip off if you're not supporting the vase from the bottom while carrying.

While we're on the topic of thanking teachers, here's another one we made during teacher appreciation week. This one was even easier! This is a pretty lame photo, but you get the idea. We attached the tag with some curling ribbon.
This could easily be adapted to give to anyone you think is AWesome.
Do you do anything for teachers at the end of the school year? Something crafty or just a note to tell your teachers how much you appreciate them? I've heard those simple notes of gratitude are the best.

Monday, July 11, 2011

Money for the Orphans

Remember how we had a yard sale to earn money for the orphans in Africa? If you have no clue what I'm talking about, this post will fill you in. I thought we only made about $400 because I only counted the bills and left the coins for Camille to count {for math practice, of course}. She did an excellent job - I was amazed at how well she counted by fives and tens!
Math isn't her only forte. She is quite skilled at funny faces!
It turns out we made $464.02! A huge thank you to all the family, friends, and even a few strangers who made this possible. We had 27 people come together to make this happen through their generosity; we never could have done this on our own. I am reminded of the parable when Jesus fed the multitude with two fish and five loaves of bread. I have witnessed the faith of a six year old turn two pennies into more than $450 which will benefit children of God through Mothers Without Borders.
The money we raised is enough to feed a child for a year and a half or 18 children this month.
This money could send three children to school for a year {includes two uniforms, shoes, socks, a book bag, pencils, text books and school fees}
Perhaps it will be used to buy farming tools for the community gardens.
Maybe it will buy textbooks or other school supplies. Perhaps it will even help build a school.

Mothers Without Borders has many programs that benefit the children in Africa, and we are grateful that this money will be used to bless the lives of others.

If you want to read more about our yard sale adventures, you can check out the pre-yard sale post and the "what I would have done differently" post.

Sunday, July 10, 2011

Joseph's First Birthday

Our baby turned one year old! What? You missed it? I know some parents enjoy going all out for the first birthday but we decided not to rent the zoo and invite every person we've ever known. Sorry bout that...it was nothing personal. Todd was still recovering from surgery to fix his deviated septum and my parents were out of town on vacation, so we decided to have a nice quiet birthday celebration at home. 
We did invite a few of the cousins, aunts, and uncles. Actually we invited them all {at least all the local ones} because our family is tight like that. But just a few were able to make it and we're so glad they joined us. We did some of Joseph's favorite things like dancing...
 And eating...
And playing with garbage. Okay, perhaps Joseph's the only one who decided to do that. Cue the typical "kids enjoy the packaging more than the toys" comment. 
Each person wrote down something they like about Joseph or a special memory from this year, and the younger cousins drew him pictures. I have these in an envelope for him {maybe I'll decorate it someday} as a special keepsake from his first birthday.

So there you have it. Yep, that's it. No fancy decorations {just a couple pom poms and balloons}, no creative invitations {we just called family}, no smothering of gifts {just practical things like sippy cups and cheerios}, and no designer cake that cost us a small fortune {we're saving for college}. Is everyone in the blogosphere gasping yet?
Don't get me wrong. I'm not anti-party and I love looking at all the fun party themes and ideas out there. In fact, sometimes I see all those creative parties and feel guilty for not having the time and energy to tackle something like that. But then I remember that my time and energy was and is being spent on my family, which will outlast any party favor I could ever muster making. The lack of an elaborate production in no way diminishes the way we feel about our bundle of joy that arrived a year ago. We are so blessed to have Joseph in our family. His sweet spirit radiates pure joy throughout our home, and somehow he unites our family and strengthens our bonds of love for each other.

So how do you like to celebrate birthdays? Do you like to keep it simple or go all out with theme parties or do a little of both depending on the year? Any birthday traditions out there?

Tuesday, June 28, 2011

How to Host a Benefit Yard Sale

Having a benefit yard sale is hard work! We spent the last few weeks gathering donations for our yard sale to earn money for the orphans in Africa {specifically Zambia}. We made about $400 which we are donating to Mothers Without Borders!  This was such a wonderful experience, and I have been overwhelmed by the generosity of our friends, family, and many strangers. It was fun to meet new people who are actively engaged in our community, and we learned about some new programs we can participate in to help people in need locally.

One of the kind people we met told us where to find our local shelter and asked us to donate any of her clothes that didn't sell. We had soooo many clothing donations for the yard sale, we took most of hers directly to the shelter so Camille could be more involved. Here Camille is holding the smallest of the three bags we donated.
I was so excited to tell Camille that her two pennies turned into more than $400 because of her desire to help other children; I only wish she could have been there to take part in the mayhem fun. We were going to hold the yard sale last weekend but I didn't prepare adequately for the rain {I momentarily forgot that we live in Washington where it can rain at any given moment. All. the. time.} So we had to push it back a week. Unfortunately she is in Idaho for a family reunion. We wanted to wait for her to return, but we had donations spilling out all over our little condo and had other donations stashed in two of our friends' garages. We just had to press forward.
Dang that rain, and dang my poor planning. Which brings me to the rest of today's post.

Prior to our yard sale I did some research and made a list of things to help prepare me for the yard sale. That was definitely helpful, but there are several things I would have done differently. My biggest suggestion is to recruit, recruit, recruit! Have fun and get all your friends to help out!

Storing & Collecting Donations
Storage. One thing I didn't consider was that my place would fill up so fast with donations! People were very generous for which we were so grateful. If you don't have a garage, I would recommend recruiting a friend {or two or three} with a garage to help store things, especially furniture donations.

Donation Drop Offs. Next time I would ask people to bring donations to me instead of trying to go around picking them all up. I wanted to make it easier on the people so generously donating items so I went around collecting. In the future I would only do this for elderly people who couldn't bring it to me.

Clothing. We had sooooo many clothing donations! Next time I would probably be very picky about the clothing donations I would accept. We had a hard time displaying them at the yard sale and most of them didn't sell. I would select only the best of adult clothing and accept all unstained children and baby clothes - those were the best sellers. I would suggest the donater take all remaining clothing to their local homeless shelter so it can benefit those in need.

Be Picky & Sort Promptly. It is helpful to sort items with people as they make donations; this allows you to be more picky about the items you accept. If they just drop off a bag, you may be left with many unsellable items that you have to get rid of {either trash or hauling to other locations}. If you don't want to hurt people's feelings, you could say, "We already have a lot of this item so I can't accept any more," or "I am running short on space so I can only take these donations."

Yard Sale Prep & Organization
Haul it Together. I live in a condo and our HOA prohibits yard sales. We had to haul all of the donations over to my sister-in-law's house {thank you Tiffany!} and it took four minivans filled to the brim to get all our donations over there. Oh, and then two more trips for the furniture donations. So six trips total! We took everything over the day before and it took about 6 hours for two of us to load and unload everything, set up tables, and sort. Next time I would get several friends with trucks and/or vans to come help load everything up all at once. Then we could all help unload and sort items onto their respective tables.

Indoors. If you can do it inside, I would highly recommend this! We had to postpone our yard sale because I didn't prepare adequately with tarps and tents. Even when I was prepared and the forecast was clear it rained in the middle of setup. Because there was so much stuff we had to set up in the back yard, cover everything with tarps, and move everything to the front the next morning. What a pain! If you set up indoors the day before you can leave everything as is.

Don't try to display everything! Books, movies, toys, clothes, miscellaneous cords/chargers work well in boxes. If you put it all out, it just looks cluttered and junky {oops}! People are probably willing to dig a little through these items, but only if it's organized. Cords should be wrapped up or put in ziplock baggies. Labeled boxes of baby and children clothing can be sorted by size and gender. For example, one box would say: baby girl clothes through 18 months. Another box: Baby Boy Clothes through 18 months. And so forth. Adult clothing should be hung on hangers except for jeans and tee shirts could probably go in a box {also labeled and sorted by gender and type, not size - remember, be picky about donations!} We had a blanket out with all the toys dumped on it so the kids could play with them. I think it would have been better to have the blanket out and put some of the best toys on it with the rest in boxes next to it. Then sort the toys by size {if doing general pricing for large, medium, and small toys} and label the boxes with price.

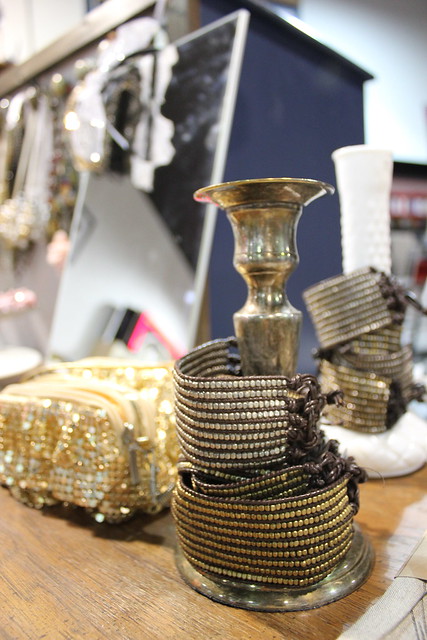
Some items should definitely be displayed. I didn't sort through the jewelry very well, but wish I would have sorted all bracelets, necklaces, rings, and earings and displayed them appropriately. Nicer things could have been arranged into cute little vignettes to make them more appealing than just set out on the table. Just couldn't resist posting these cute jewelry displays found here. You could put bracelets around a candlestick or vase. And that looks like an upside down bowl with a plate on top. Kind of quirkly and fun. IMG_1311  IMG_1315

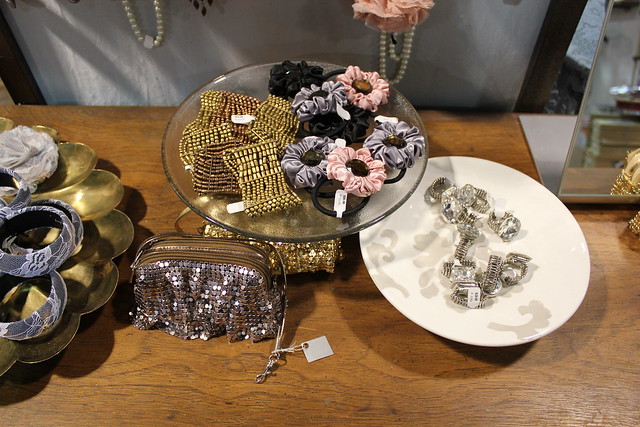
What about rings in a pile of beans found here? Maybe. But check out the background stands that the bracelets are on. You could DIY one of those with an empty toilet paper roll. Oh, man. I just crossed the line of waaay too much time and energy spent on this. Next...

Sheets as tablecloths. Some of our tables were old and/or stained and would have looked much nicer with a sheet covering them. The nicer your stuff looks the more people will be willing to buy it. I was surprised at how many quality items weren't sold at our yard sale.

Plug it in. I had electrical cords, batteries, and light bulbs for people to try things out. Unfortunately people probably didn't know that and certainly didn't ask. Next time I would actually have things plugged in and batteries installed {with a BIG sign on table that batteries are not included}. I would keep this table close to checkout so people don't trip on the cords.

Signage. I would make a huge sign saying where money is being donated. We talked to people as they came in and had some info at the cash table, but most people just handed me the money and didn't even look at the sign on the jar.

Food. Keep checkout table separate from food table. We had cookies, lemonade, rice crispy treats, chocolates, and licorice for sale but there just wasn't enough room and people were always hovering at the checkout. I would have a separate table with its own donation jar for food items so it looked clean and inviting. This way people who don't find any treasures to buy will realize they can just have a snack and/or make a donation.
Are you inspired or worn out just reading about it? It was a ton of work to put on this yard sale, but it was definitely worth it. I am inspired by the kindness or our community and the generosity of people when they know you are helping others. But keep in mind helping others doesn't have to be a huge project! You can make a small monetary donation {if everyone gives a little it turns into a lot!} or just donate some clothing to your local shelter. Even sharing your smile helps make the world a better place.

Monday, June 27, 2011

Planning a Benefit Yard Sale

Have you ever noticed how similar the words garage and garbage are? Well I suppose one man's trash is another man's treasure. My husband thinks that should read, "One man's trash is another woman's treasure." At any rate, we are leaving garbage out of the equation and having...a yard sale!

Remember when Camille wanted to give money {and toys} to the orphans? We went through our house to see what we could whip up for a yard sale to earn some money to donate to Mothers Without Borders. We realized we didn't have nearly enough stuff to sell so we decided to get others in on the action.

I did a fair amount of online research to prepare for the big day {all of which is below}, but no amount of reading could prepare me for the actual yard sale madness. I'll post tomorrow about our experience and the things I would have done differently.  But for now, here are some good tips for hosting a yard sale. Some of these ideas were mine and some came from here and here.

Advertising
Written advertisements: school newsletter, church newsletter, newspaper {ask to have it posted in local events and classifieds}
Flyers: post on bulletin boards at grocery store, laundromat, etc. Ask your friends and family to post in places they frequent. {This was especially beneficial - many people who saw the flyers donated items}
Electronic: Facebook and Craigslist. You could also try television & radio network websites.
Make sure to list items that will be of interest to people, particularly furniture.
Put signs out the night before and use balloons.

Maximize Profits
Have a soda/snack table to help raise money. Maybe we can get these items donated?
Check purses and pockets of donated items for money.
Ask people if they would like to round up to the nearest dollar {ie. purchase is $4.75, round up to $5?}
Bargain with people - the idea is to sell as much as you can! Slash prices when business drops off.
Have a bag sale during the last hour of the sale {anything you can fit in this bag $2}.
Donate anything left over to charity!

Organization
Get racks to hang clothing on. Here it suggests to tie pipe pieces to rafters, but that only works if you are inside...
If you're doing a fundraiser, ask a local dry cleaner to donate hangers for hanging clothes.
Have a kid area for kids to play with/bond with toys. Yes, this is sneaky and hopefully effective!
Have a calculator and lots of small change handy {$50 in fives, $25 in ones, and $20 in quarters, $5 in dimes}
Have an extension cord, batteries, and light bulbs so people can test to see if items work. Also make sure you have a screwdriver to open battery compartments.
Have a tape measure so people can measure furniture if they need to.
Provide a changing area and mirror.
Keep a large supply of plastic bags on hand so people can wrap and tote their new treasures easily.
Label anything that needs it.
Keep big items close to door. Have "Sold" signs available for those that have to come back for those big items {don't hold for pickup unless you have already received the money, otherwise you may end up with "unsold" items}.
Have basic prices posted on tables and at checkout. Keep valuable items close to register.
Have a sign on all tables reminding people where all proceeds will be donated.
Located near checkout have information about the organization you are donating to.

Volunteers
Don't be afraid to ask for help; this is so much more fun when you are doing it with your friends and family! People are usually excited to help out, they just need to know specifically what to do. Make a list of things you need done and assign them in advance. This keeps people involved so they don't drop out at the last minute thinking you have enough help.
Have a sign making party. Making signs took waaaaay longer than I expected! Hours, people. {cut me some slack, they were big. and I'm a bit of a perfectionist. So what.} I made mine by myself but it would have been much more fun to be making them with friends.
Have a sorting party {can you tell I like parties?} Get together and sort stuff. This is also a good time to price things that may not fit in general pricing categories.
Day Before: buy helium balloons, set up signs with balloons {and make a note of where they were placed}
Day of: set up tables, organize displays, someone to answer questions/reorganize/straighten up, make sales {assist bargainers/slash prices}, take payments, take down signs, take unsold items to charity.


If you're considering hosting a yard sale for a fundraiser, this is the ultimate source for tips!

Friday, June 3, 2011

Barbies and Pennies

One day I found an egg carton in our kitchen with two pennies in it and a sign that said, "mune 4 the orfns". At least I think that’s what how Camille spelled it {someone accidentally recycled it before I could take a picture}. Translation: Money for the orphans. Then there was a Barbie next to it with a sign taped to her: "We love you!"

Of course I hopped online to see how we could get this Barbie to a little girl who would love it. It seems that orphans in our country are pretty well taken care of through the foster system, so we looked to other countries for those orphans who could benefit the most from our contribution {which will be more than two pennies and a Barbie doll}. We decided we could sell that Barbie and other items we would normally donate to charity and send the money to the orphans in Africa.

I remembered hearing about an organization called Mothers Without Borders and with Camille's help decided that this would be the best way to help orphans. I always worry that monetary donations will be spent unwisely and go mostly toward overhead costs rather than to children. But not here! I have compared them with other organizations and Mothers Without Borders has the highest percentage of funds going to programs benefiting the children. If you are thinking about making a monetary donation to an organization, you can find out how your money will be spent by visiting Charity Navigator. This website tells you how charities spend their money {on programs vs. administrative costs and fundraising}, background on the charity, and lists charities with similar missions. Pretty handy!

So what about you? Do you have any causes that are close to your heart? How do you help your kids get into the giving spirit or how have they encouraged you?

Oh, and just for the record, I have no affiliation with Charity Navigator. I heard about them from another mom and have found their service to be helpful in my efforts to donate.

Sunday, May 1, 2011

Tango with a Mango

Do you like cheese with your mango? Cause that title is cheese-y! But I am lovin mango right now, which is good because I have three of them sitting on my counter. I had a weekend with the girls in Seattle and we had such a great time! We spent the majority of our at "Time Out," a women's conference full of inspirational insight into all apects of my life from mothering to religion. It was the best time out ever! Isn't it funny how as adults we long for the things we despised as kids? PLEASE, will someone give me a time out, send me to my room, make me take a nap, or better yet...put me to bed early?!

Anyway, we were just blocks away from Pike Place Market so we decided to head over and do the tourist thing.
There is always so much to see, smell, and taste at the market - it's like sensory overload. I wish I had a sensory filter, though. Fish is fun to watch fly through the air, but the smell? Ick. There were the usual jams, honeys, and spreads to try but this time I found a couple new things. I tried some veggie chips - pretty good, but not worth nine buckaroos for a small bag. I also sampled some delicious mango. I wanted to take one home for the kiddos to try, but I used the last of my cash to buy a flower bouquet. In order to use my handy dandy debit card I had to buy at least $5 of produce, which scored me three mangos. 
Once home I had a hard time figuring out how I was supposed to cut this thing. There is a seed in the center which is long and flat! So I went to my favorite source, the Internet to figure out the best way to cut this thing open. It's my lucky day...there is a National Mango Board! I never would have imagined. Now I have the ultimate mango source for all things mango. So check it out and grab a mango!

Side note: My photo skills were feeling weak during this trip. Plus I was pushing a stroller through mobs of people and trying to hold tight to my beautiful bouquet while making sure my wallet didn't topple out of my overstuffed diaper bag. So it's time to give credit to those whose pictures I snagged online. Pictures from here and here.